Showing posts with label UDF. Show all posts

Saturday, August 16, 2014

Bootstrapping OIS-adjusted Libor curve in VBA

OIS discounting has been hot topic for the last few years, since most of the collateralized OTC swaps are valued by this methodology. In this blog post, I will present simple example algorithm for bootstrapping OIS-adjusted Libor curve from market data (OIS zero-coupon curve, Libor par swap curve). This bootstrapped curve can then be used to generate floating leg cash flows, when valuing collateralized interest rate swap with all cash flows and collateral in the same currency. Final product will be just one simple VBA worksheet function to be used in Excel.

VALUATION 101

In essence
  • Instead of using Libor zero-coupon curve for cash flow discounting, all swap cash flows are present valued with discount factors calculated by using OIS zero-coupon curve. 
  • The use of OIS zero-coupon curve for discounting collateralized swap cash flows is justified, because posted collateral earns overnight rate and collateral value is mark-to-market value of a swap. In order to equate these two cash flows (collateral value, mark-to-market value of a swap), discount factor for both cash flows has to be calculated by using OIS curve.
  • Cash flows for swap fixed leg are still constructed by using ordinary Libor par swap rates. 
  • Another impact of OIS valuation hits into construction of floating leg coupon rates, which are technically forward rates.
  • In the "old world", we bootstrapped Libor zero-coupon curve, from which we calculated discount factors and forward rates (for constructing floating leg coupons) at the same time. Only one curve was needed to accomplish this procedure. 
  • Because all swap cash flows are now discounted with OIS zero-coupon curve and ordinary Libor par swap rates are still used for constructing swap fixed leg cash flows, forward rates have to be "adjusted" slightly, in order to equate present value of all swap cash flows to be zero.
  • Technically, we end up with a system of linear equations, in which we equate OIS-discounted floating cash flows with OIS-discounted fixed cash flows and solve for the unknown forward rates.
Material, which has helped me to understand this subject a bit better is the following: technical notes written by Justin Clarke, teaching material by Donald J. Smith and Barclays research paper by Amrut Nashikkar. These papers have worked numerical examples, as well as theoretical issues covered thoroughly.

VBA FUNCTION


Option Explicit
'
Public Function OIS_bootstrapping(ByRef curves As Range) As Variant
    '
    ' import source data from Excel range into matrix
    Dim source As Variant: source = curves.Value2
    '
    ' create all the needed matrices and define dimensions
    Dim nSwaps As Integer: nSwaps = UBound(source, 1)
    Dim fixed As Variant: ReDim fixed(1 To nSwaps, 1 To 1)
    Dim float As Variant: ReDim float(1 To nSwaps, 1 To nSwaps)
    Dim forward As Variant: ReDim forward(1 To nSwaps, 1 To 1)
    '
    ' counters and other temp variables
    Dim i As Integer, j As Integer, k As Integer, nCashFlows As Integer
    Dim OIS_DF As Double, OIS_Rate As Double, t As Double
    '
    ' loop for cash flows processing
    nCashFlows = nSwaps: k = 0
    For i = 1 To nSwaps
        '
        ' create OIS discount factor
        OIS_Rate = source(i, 2): t = source(i, 1)
        If (t <= 1) Then OIS_DF = 1 / (1 + (OIS_Rate * t))
        If (t > 1) Then OIS_DF = 1 / (1 + OIS_Rate) ^ t
        '
        ' create sum of fixed leg pv's for each individual swap and create all
        ' cash flows (excluding coupon rate) for floating legs for each individual swap
        For j = 1 To nSwaps
            If (j <= nCashFlows) Then
                fixed(j + k, 1) = fixed(j + k, 1) + 100 * source(j + k, 3) * OIS_DF
                float(i, j + k) = 100 * OIS_DF
            Else
                ' replace empty array value with zero value
                float(i, nSwaps - j + 1) = 0#
            End If
        Next j
        '
        k = k + 1: nCashFlows = nCashFlows - 1
    Next i
    '
    ' solve for implied forward rates, which are going to be used to generate coupons
    ' for floating legs. matrix operation: [A * x = b] ---> [x = Inverse(A) * b]
    ' where A = float (N x N), x = forward rates (N x 1), b = sum of swap fixed leg pv's (N x 1)
    forward = WorksheetFunction.MMult(WorksheetFunction.MInverse(WorksheetFunction.transpose(float)), fixed)
    OIS_bootstrapping = forward
End Function
'


EXAMPLE CALCULATION


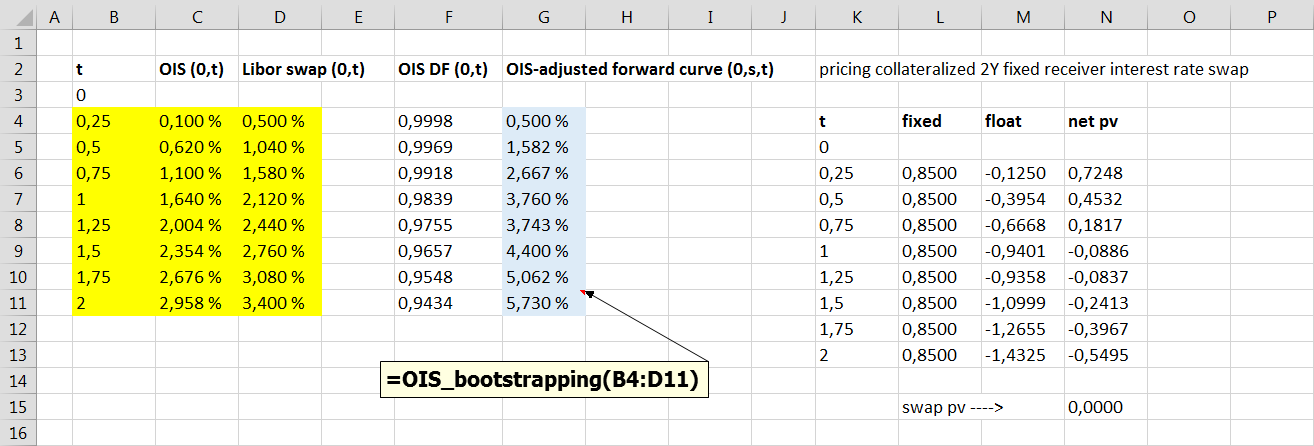
The following Excel screenshot presents bootstrapped OIS-adjusted forward curve (column G) and OIS valuation for collateralized 2Y interest rate swap. For the sake of simplicity, this example assumes that the payments for the both fixed and floating legs takes place quarterly. Swap fixed cash flows has been constructed by using Libor par swap rates. Floating leg cash flows has been constructed by using bootstrapped OIS-adjusted forward curve. Finally, all cash flows are discounted by using OIS discount factors (column F). The present value of all swap cash flows is zero. Worksheet function input range has been marked with yellow color and function output range has been marked with blue color.


Presented forward curve construction scheme applies to a specific case, in which collateralized interest rate swap has the both cash flow legs and collateral in the same currency. Moreover, it is assumed that the payment frequency is the same for the both swap legs. Successful replication of the forward curve bootstrapping result was achieved, when testing VBA worksheet function with the cases presented in above-mentioned papers by Smith and Clarke.

Thanks for reading.

-Mike
Saturday, March 8, 2014

Creating C# Excel Addin with Excel-DNA

In the last posting, I was presenting how to create interface between C# and VBA by using Excel-DNA. As a result, we were able to write a function in C# and use that function inside VBA with full support for intellisense. For the sake of completeness, I will also present how create Excel XLL Addin with Excel-DNA and use C# function in Excel, just like an ordinary Excel worksheet function. So let us start, once again.

PROJECT RESULT

The end result of this small example project will be a simple C# function, which can be used in Excel just like an ordinary Excel worksheet function. For this project, I have been using Visual Studio 2010 Express with Framework 4.0.

PREPARATORY TASKS

Download and unzip Excel-DNA Version 0.30 zip file to be ready when needed. There is also a step-by-step word documentation file available within the distribution folder. In this project, we are going to follow these instructions.

STEP ONE : C# function

Create a new C# Class project "FunctionLibrary". Rename created default "Class1.cs" to be "VBAFunction.cs". For the class VBAFunction.cs, copyPaste the following code and replace the existing code with this one.

using System;
//
namespace FunctionLibrary
{
    public static class VBAFunction
    {
        public static double add(double x, double y)
        {
            return x + y;
        }
    }
}

Next, build solution and remember to save this project.

STEP TWO: Excel-DNA

Add reference to Excel-DNA library (Project - Add reference - Browse - \\ExcelDna.Integration.dll) and click OK. This dll file is inside the distribution folder what we just downloaded from Excel-DNA website. From the properties of this reference, set Copy Local to be False.

Add new file as text file to project (Project - Add new item - Text file) and name it to be FunctionLibrary.dna. CopyPaste the following xml code into this file.

<DnaLibrary Name="FunctionLibrary" RuntimeVersion="v4.0">
  <ExternalLibrary Path="FunctionLibrary.dll" />
</DnaLibrary>

From the properties of this dna file, set Copy to Output Directory to be Copy if newer.

Next, from the downloaded Excel-DNA folder (Distribution), copy ExcelDna.xll file into your project folder (\\Projects\FunctionLibrary\FunctionLibrary) and rename it to be FunctionLibrary.xll. Then, add this xll file into your current project (Project - Add existing item). At this point, it might be that you do not see anything else, except cs files on this window. From drop down box on the bottom right corner of this window, select All files and you should see FunctionLibrary.xll file what we just pasted into this FunctionLibrary folder. Select this file and press Add. Finally, from the properties of this xll file, set Copy to Output Directory to be Copy if newer.

Build the solution. Everything should have gone well without any errors or warnings. At this point, my \\FunctionLibrary\bin\Release folder looks like the following.


At this point, we are done with C# and Excel-DNA.

STEP THREE: Excel

Open a new Excel workbook. While this workbook is open, doubleClick FunctionLibrary.xll file in your \\FunctionLibrary\bin\Release folder. After this, xll file content can be used by Excel and our C# function (add) is available like an ordinary worksheet function in Excel.


Job done. We have now successfully created Excel XLL worksheet function Addin with Excel-DNA.

STEP FOUR: Packing

Even our Addin is now fully operational, we would be facing variable amount of problems with all separate files included in the project, in the case we would like to distribute this for our clients. Frankly speaking, other people usually do not have time or interest for settling any potential issues involved with all these files received. For this purpose, we can pack all our project files into a neat package, which then can be distributed.

In C#, open FunctionLibrary.dna file, and replace its content with the following xml code.

<DnaLibrary Name="FunctionLibrary" RuntimeVersion="v4.0">
  <ExternalLibrary Path="FunctionLibrary.dll" Pack="true"/>
</DnaLibrary>

Now, build the project again. Next, open command prompt and write the following command:


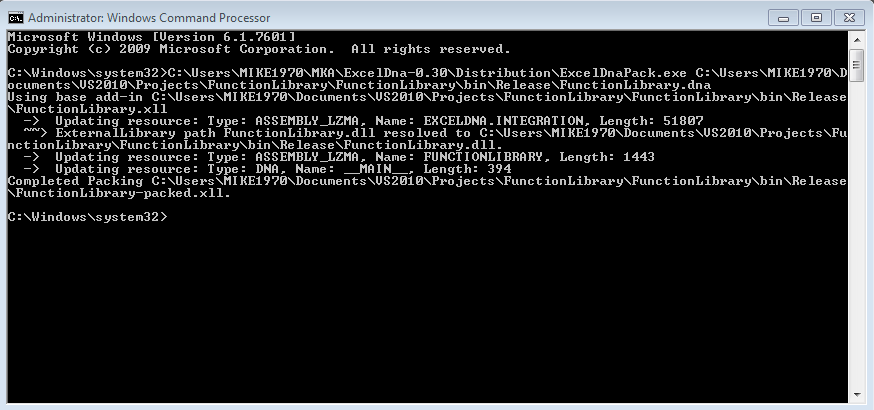
Replace my address strings with your own address strings. In a nutshell, within the strings what I have been writing into command prompt above, there are two addresses joined (a space character between the strings): first address is to ExcelDnaPack.exe (in \\ExcelDna-0.30\Distribution folder) and second address is to FunctionLibrary.dna (in \\FunctionLibrary\bin\Release folder). After writing the strings and pressing enter, the following information appears in command prompt. If you do not see the following information, then something has gone wrong.


This information tells us, that ExcelDnaPack.exe has now successfully created fully distributable and stand-alone Excel XLL Addin. Let us take a look at my project folder \\FunctionLibrary\bin\Release.


We can see that FunctionLibrary-packed.xll file has been created into this folder. Now, this packed xll file can be freely re-named, distributed for your clients and run with no other files required. Both FunctionLibrary.dna and FunctionLibrary.dll are packed inside xll file as resources, and will be loaded at runtime. If you repeat step three (using FunctionLibrary-packed.xll), you will see that this Excel XLL Addin is working as expected.

For learning more things about Excel-DNA, check out its homepage. Getting more information and examples with your problems, the main source is Excel-DNA google group. For those who would like to see useful examples using Excel-DNA in financial programs, there is an excellent book C# for Financial Markets (chapter 22) written by Daniel Duffy and Andrea Germani (published 2013). Finally, Excel-DNA is an open-source project, and we (the happy users) can invest its future development by making a donation.

Thanks for reading.

-Mike

Friday, June 21, 2013

Using MS Solver Foundation and C# in Excel with Excel-DNA

In one of my latest posts http://mikejuniperhill.blogspot.fi/2013/06/using-excel-solver-with-vba.html I was presenting my approach for using Frontline Solver in Excel with VBA. I was also mentioning, that I would like to get rid of linking my program with concrete ranges in Excel worksheet. Why? To be able to create convinient User Defined Functions (UDF) for solving optimization routines. I would like to have an optimization tool, in which I take all given parameters and data inside to a program and perform any desired optimization routines inside a program, without interacting with Excel ranges. Now it is a good time to present one such a tool - Microsoft Solver Foundation (MSF).

You can use MSF for creating a wide range of different types of optimization models in C# for example. From there, you can link your solver model back to Excel with Excel-DNA http://exceldna.codeplex.com/. This means, that you can set up your data and other parameters in Excel workbook, then use C# and MSF to perform desired optimization routine without interacting with Excel and finally, push the results back to Excel worksheet. In other words, you can create Excel UDF for solving optimization routines.

Let us first go through, what we are going to reach in this post:
  1. We set up MSF to be used in Visual C# 2010 Express.
  2. We create optimization model in C# by using MSF.
  3. We set up Excel-DNA linking for C# program.
  4. We create interface function for handling data between Excel and C# program.
  5. We verify MSF model results against Excel Frontline Solver results.
So, let us get into it. First, open your Visual C# 2010 Express.

Microsoft Solver Foundation setup

First, we have to find MSF dll library file. We need to have Solver Foundation v3.0 - DLL only. I found it from here
http://archive.msdn.microsoft.com/solverfoundation/Release/ProjectReleases.aspx?ReleaseId=1799

When you have that dll file, we create a new C# Class Project in your Visual C# 2010 Express (File - New Project - Class Library - Name=MSF_Solver). Remember to save your project. Now, create reference to that MSF dll library file (Solution Explorer - References - Add Reference - Browse). If everything goes correctly, you should be able to build the following test program without any errors. This program is just for quick testing, that your MSF is ready for servicing.

using System;
using System.Collections.Generic;
using System.Linq;
using System.Text;
using Microsoft.SolverFoundation.Services;

namespace MSF_Solver
{
    public class ExcelFunctions
    {
        SolverContext solver = SolverContext.GetContext();
    }
}

I assume that everything went correctly without any errors in your build. At this stage, we have set up MSF to be used in our Visual Studio. One word about the tools: I am using Visual C# 2010 Express and having .NET Framework 4.0 as my Target framework.

The C# Program

Now we need to create the actual program, which will be using MSF to perform desired optimization routine. First, we create ISolver interface, from which all possible Solver models are going to be implemented. This interface is having only one method (solve) and it returns Dictionary data structure (string, double). In your Visual Studio, add new Interface to your project (Solution Explorer - MSF_Solver Project - Add - Add New Item - Interface - Name=ISolver). You can copy-paste the following program into this interface.

using System;
using System.Collections.Generic;
using System.Linq;
using System.Text;

namespace MSF_Solver
{
    public interface ISolver
    {
        Dictionary<string, double> solve();
    }
}

Next, we need to create an implementation for this interface. Add a new Class to your project (Solution Explorer - MSF_Solver Project - Add - Add New Item - Interface - Name=PolynomialFitting). You can copy-paste the following program into this class.

using System;
using System.Collections.Generic;
using System.Linq;
using System.Text;
using Microsoft.SolverFoundation.Services;
//
namespace MSF_Solver
{
    //
    // PolynomialFitting implementation for ISolver interface is fitting nth degree polynomial 
    // approximation function to a given set of data points by using ordinary least squares method
    public class PolynomialFitting : ISolver
    {
        private Dictionary<double, double> curve; // data points to be fitted (x-value, y-value)
        private int degree; // define degree for polynomial function
        //
        public PolynomialFitting(Dictionary<double, double> curve, int degree)
        {
            this.curve = curve;
            this.degree = degree;
        }
        //
        // ISolver interface method implementation
        public Dictionary<string, double> solve()
        {
            // create solver model
            SolverContext solver = SolverContext.GetContext();
            solver.ClearModel();
            Model model = solver.CreateModel();
            //
            // create decision variables for solver model, based on given polynomial degree
            Dictionary<string, double> coefficients = new Dictionary<string, double>();
            for (int i = 0; i <= degree; i++)
            {
                coefficients.Add("b" + i.ToString(), 0.0);
            }
            //
            // add decision variables to solver model
            var decision = coefficients.Select(it => new Decision(Domain.Real, it.Key));
            model.AddDecisions(decision.ToArray());
            //
            // create objective function by using SumTermBuilder
            var objectiveFunction = new SumTermBuilder(curve.Count);
            //
            // itarate through all given data points
            foreach (KeyValuePair<double, double> kvp in curve)
            {
                // create term object incrementally for squared error (y estimate - y actual)^2
                Term subTerm = 0;
                for (int i = 0; i < model.Decisions.Count(); i++)
                {
                    // y-estimate = (b0 * maturity^0 + b1 * maturity^1 + ... + bn * maturity^n)
                    subTerm += model.Decisions.ElementAt(i) * Math.Pow(kvp.Key, i);
                }
                subTerm -= kvp.Value; //  subterm = (y estimate - y actual) = e
                subTerm *= subTerm; // subterm = e^2
                objectiveFunction.Add(subTerm); // add subterm to objectiveFunction (SumTermBuilder)
            }
            //
            // define optimization type and give objective function SUM(e^2) to be minimized
            model.AddGoal("SumOfSquaredErrors", GoalKind.Minimize, objectiveFunction.ToTerm());
            //
            // solve model and transfer results (optimized decision variables) from 
            // model into a dictionary object which will be returned for the caller
            Solution solution = solver.Solve();
            Dictionary<string, double> parameters = new Dictionary<string, double>();
            foreach (Decision parameter in model.Decisions)
            {
                parameters.Add(parameter.Name, parameter.ToDouble());
            }
            return parameters;
        }
    }
}

The previous class takes in a given set of data points (x, y) inside Dictionary data structure, along with the information about the required polynomial degree of the approximation function to be fitted with data. Relevant comments are included inside the program. More information on MSF can be found with Google. Also, Here are two excellent hands-on examples on using MSF from Mathias Brandewinder: 
http://www.clear-lines.com/blog/post/First-steps-with-the-Microsoft-Solver-Foundation.aspx http://www.clear-lines.com/blog/post/Create-optimization-programs-dynamically-with-C-and-the-Microsoft-Solver-Foundation.aspx

At this point, we have created our desired optimization model in C# by using MSF. Next, we need to set up Excel-DNA for linking our C# program with Excel Worksheet.

Excel-DNA part

First we have to find Excel-DNA files. I was able to find these from here http://exceldna.codeplex.com/ by going to Downloads. I have been using ExcelDna-0.29 so far, but there is now version 0.30 available, as I am writing this post. Download zip file and unzip the content into some appropriate folder.

Next, in our C# program, we need to create reference to Excel-DNA dll file (Solution Explorer - References - Add Reference - Browse). You should find ExcelDna.Integration.dll file. In Properties window, mark this reference as Copy Local = False.

Next, Add a new file (dna file) to the project (Solution Explorer - MSF_Solver Project - Add - Add New Item - Text File - Name=MSF_Solver.dna) with the following content:

<DnaLibrary Name="MSF_Solver" RuntimeVersion="v4.0">
  <ExternalLibrary Path="MSF_Solver.dll" />
</DnaLibrary>

In the properties for this file, set that this file will be copied to the Output directory. Set Copy to Output Directory = Copy if newer.

Then, create a copy of the ExcelDna.xll file (you can find this xll file in your unzipped Excel-Dna folder) into the project directory, and rename it to be MSF_Solver.xll. Add this file to the project (Solution Explorer - MSF_Solver Project - Add - Add Existing Item - MSF_Solver.xll), and in the properties for this file, ensure that it will be copied to the Output directory. Set Copy to Output Directory = Copy if newer.

After these important settings, build your solution. I assume everything has gone well to this point. Setting up Excel-DNA is not difficult, but still one needs to be very careful. One slip in settings and you will spend a lot of time with your compiler, wondering why this is not working. So, be careful out there.

Detailed instructions for setting up Excel-DNA functionalities in Visual Studio can be found from here http://exceldna.codeplex.com/documentationFind the following Word documentation Excel-DNA - Step-by-step C# add-in.doc In that documentation, find the section Creating a new add-in library in C#. The process of setting up Excel-DNA has been described in a very detailed way in that section, along with some screen captures.

At this point, we have set up Excel-DNA files for linking our C# program with Excel Workbook. Next, we are going to create interface function for handling data between Excel and C# program.

Interface function between Excel and C#

At this point, you should have that one Class (ExcelFunctions) existing in your current project (the one, in which we tested MSF originally). You can copy-paste the following code into that class.


using System;
using System.Collections.Generic;
using System.Linq;
using System.Text;
using ExcelDna.Integration;

namespace MSF_Solver
{
    public class ExcelFunctions
    {
        [ExcelFunction(Category="Excel-DNA functions", Description = "Coefficients for nth degree polynomial curve fit to a given set of data points by using OLS method")]
        public static object[,] PolynomialCurveFitting([ExcelArgument(Description = "2-dimensional array of (x, y) values")] Object[,] curve, [ExcelArgument(Description = "Degree for polynomial function")] int degree)
        {
            // number of data points for a given curve is dynamic
            int rows = curve.GetUpperBound(0);
            //
            // read a given curve data into a dictionary
            Dictionary<double, double> dict = new Dictionary<double, double>();
            for (int i = 0; i <= rows; i++)
            {
                dict.Add((double)curve.GetValue(i, 0), (double)curve.GetValue(i, 1));
            }
            //
            // create appropriate solver model, perform curve fitting and receive optimized coefficients
            ISolver solver = new PolynomialFitting(dict, degree);
            Dictionary<string, double> coefficients = solver.solve();
            //
            // create array for output
            // key is coefficient name (string) and value is coefficient value (double)
            object[,] arr = new object[coefficients.Count , 2];
            //
            for (int i = 0; i < coefficients.Count; i++)
            {
                arr[i, 0] = (string)coefficients.ElementAt(i).Key;
                arr[i, 1] = (double)coefficients.ElementAt(i).Value;
            }
            return arr;
        }
    }
}

First, PolynomialCurveFitting method is receiving data as 2-dimensional object array from Excel. The program then reads that data into a Dictionary data structure. This Dictionary is a feed for ISolver implementation (solver), which performs the optimization part and returns optimized coefficients inside a new Dictionary back to this method (coefficients). Finally, the content of this result Dictionary is read into a new object array (arr) and returned back to Excel.

Now, build your fully completed project. At this stage, you should have the following four files in your Project directory (MSF_Solver\bin\Debug):
  1. MSF_Solver.dll
  2. MSF_Solver.dna
  3. MSF_Solver.pdb
  4. MSF_Solver.xll
Program test run - curve fitting

We test our program and verify our MSF model results against Frontline Solver results. First, set up the following swap curve data into a new Excel workbook.

0,08 0,19
0,25 0,27
0,5 0,29
1 0,35
2 0,51
5 1,38
10 2,46
20 3,17
30 3,32

While your Excel is open, go to your Project folder (MSF_Solver\bin\Debug) and double-click MSF_Solver.xll file. You may not notice anything, but behind the scenes your xll file is loaded into your Excel Workbook. If something has gone wrong, you will get an error message at this point.

Now, let us perform a curve fitting for that data with second degree polynomial function. We are going to have three output coefficients from the program (b0, b1, b2). Our C# method is returning the name of the coefficient and its optimized value. All in all, we are going to receive 3x2 output variant array in this example case. So, when using PolynomialCurveFitting function in Excel, remember to select first 3x2 array in your worksheet before creating your function formula and then press CTRL+SHIFT+ENTER to get the result array from C#.

Below here is my test run results. I have been testing this program also for other degree polynomial approximations and it seems to be working well at least against Excel Solver. We could make preliminary conclusion, that our C# MSF solver model is working as required.
MSF solver Excel solver
b0 0,1434 b0 0,1434
b1 0,2684 b1 0,2684
b2 -0,0055 b2 -0,0055

Before publishing this post, I have been following all my instructions described on this posting, re-created this program and used PolynomialCurveFitting function in Excel successfully two times. So, if you follow all the instructions carefully, you should get the working program.

Some Afterthoughts

Let us face one fact: people in banks are accustomed with Excel and they want to use it. Excel is - and probably will be for a long time - the daily workhorse. Tools like Excel-DNA can open up a lot of new doors what we can do in Excel behind the scenes. Personally I find this approach of creating a program completely outside Excel (VBA) and linking that program back to be used in Excel, to be a wonderful tool. It feels a bit like using new Rolls Royce engine in your old Volkswagen.

My personal Thank You this time goes directly to Govert Van Drimmelen, who AFAIK has developed Excel-DNA pretty much on his own. What this world really would be without such innovators? Thank You also for Mathias Brandewinder and his clear-lines.com blog for those two excellent articles on MSF. Also, Thank You for MSF team for developing such a great optimization tool.

And finally, Thank You for reading this blog again. I really hope that you have got something out from this. Have a great midsummer day!
-Mike

Wednesday, May 22, 2013

Returning dynamic array from VBA UDF into Excel

If you ever want to return non-scalar value from your VBA user-defined function (UDF) into Excel worksheet, you have to use CTRL+SHIFT+ENTER combination to return all the values. This means, that you have to know the exact dimensions of resulting array beforehand. Now, all Bloomberg users must have been wondering how Bloomberg has implemented its own worksheet functions, like BDH (for time-series data retrieving). When using that function, the user gives all required function arguments just like in any Excel build-in worksheet function and function then returns resulting array, after pressing ENTER and not using CTRL+SHIFT+ENTER combination. This means, that the user does not have to know the exact dimensions of the resulting array beforehand.

First attempt to create the corresponding functionality, would be to create some dummy worksheet UDF, which then calls separate sub routine to write an array of values into Excel worksheet. However, this attempt will fail, because a function called from worksheet is not able to modify any Excel objects (except message box). To get around this limitation (sub routine called inside UDF can not write data back to worksheet) you can use Windows Timer API . First, timer is created at the beginning of a function call. Then, timer is killed as soon as it calls desired sub procedure (which then writes data back to worksheet).

Here's my own BDH mimic below, along with comments. It may not be the most elegant one, but it should show the essence of this approach using Timer API. You can copy-paste the sample code directly into a new VBA standard module and test it. The actual worksheet interface function takes two arguments: value (which is going to be repeated), and repetitions (which defines how many times the value will be repeated below the cell, from which the function call has been made). With this approach, you could create your own UDF which takes any parameters and then retrieves data back to worksheet from database by using ADODB object inside your sub procedure what is going to be called by Timer API.


More information about Windows Timer API can be found here: http://msdn.microsoft.com/en-us/library/windows/desktop/ms632592(v=vs.85).aspx

The code might sometimes look a bit odd within the frame below, but just copy-paste everything within the frame. I have tested the code and it should be working correctly. I hope you could get something out of this. Have a nice day.
-Mike

Option Explicit
'
' Declare needed Windows API Timer dll functions
Declare Function SetTimer Lib "user32" _
(ByVal HWnd As Long, ByVal nIDEvent As Long, ByVal uElapse As Long, ByVal lpTimerFunc As Long) As Long
'
Private Declare Function KillTimer Lib "user32" (ByVal HWnd As Long, ByVal nIDEvent As Long) As Long
'
Private mTimerID As Long
Private mValue As Variant
Private mItems As Long
Private mUpdateMessage As String
Private mCurrentCellAddress As String
Private mCurrentWorksheetIndex As Integer
'
Public Function update(ByVal value As Variant, _
ByVal repetitions As Long) As Variant
    '
    ' this is the worksheet interface function.
    ' save information from caller, plus information about
    ' the current worksheet and range
    mValue = value
    mItems = repetitions
    mUpdateMessage = "Updated at " & VBA.CStr(VBA.Now())
    mCurrentCellAddress = Application.Caller.Address
    mCurrentWorksheetIndex = Application.Caller.Parent.Index
    '
    ' set timer to be launched: after 1 millisecond, timer
    ' will launch sub called fillWorksheet
    If mTimerID <> 0 Then KillTimer 0&, mTimerID
    mTimerID = SetTimer(0&, 0&, 1, AddressOf fillWorksheet)
    '
    ' finally, return information about update time for the caller
    update = mUpdateMessage
End Function
'
Private Sub fillWorksheet()
    '
    On Error Resume Next
    KillTimer 0&, mTimerID: mTimerID = 0
    '
    ' create and modify the range object so, that it does
    ' not overwrite the actual worksheet function
    Dim r As Range
    '
    ' UPDATED 31.5.2013
    ' before this procedure writes a given value n times into the worksheet,
    ' the old existing values needs to be cleared from the worksheet first
    Set r = Sheets(mCurrentWorksheetIndex).Range(mCurrentCellAddress).CurrentRegion
    Set r = r.Offset(1, 0)
    r.ClearContents
    '
    ' write given value n (repetitions) times
    Dim i As Long
    For i = 1 To mItems
        r(i, 1) = mValue
    Next i
End Sub
'